Configure F5 BIG IP APM gateway
During this task we will use the F5 console to configure F5 BIG IP to integrate with RADIUS.
Steps
There are twp parts to this configuration:
Before you begin
- Ensure that you have the common UDP port and secret key values available.
Define a RADIUS Server Profile
- Sign in to the F5 console with sufficient privileges.
- Navigate to Access > Authentication > RADIUS and then click Create… to define a new RADIUS server. In older version, navigate to Access Policy > AAA Servers > RADIUS.
- Enter the following values to create a New RADIUS Server.
Name Unique and appropriate name (OktaMFA) Mode Authentication Server Connection Direct Server Address IP or Name of Okta RADIUS Server Agent Authentication Service Port Port (1812) Secret Secret value defined above. Confirm Secret Secret value defined above NAS IP Address Optional: the ip address of the F5 NAS Identifier Optional: an identifier of the NAS Timeout Recommended: 60 seconds Retries 2 - Click Finish to save the settings.
Edit an Access Policy
-
Navigate to Access > Profiles / Policies > Access Profiles.
-
Identify the Access Profile you wish to change and click the Edit… link in the Per-Session Policy column, as shown below.

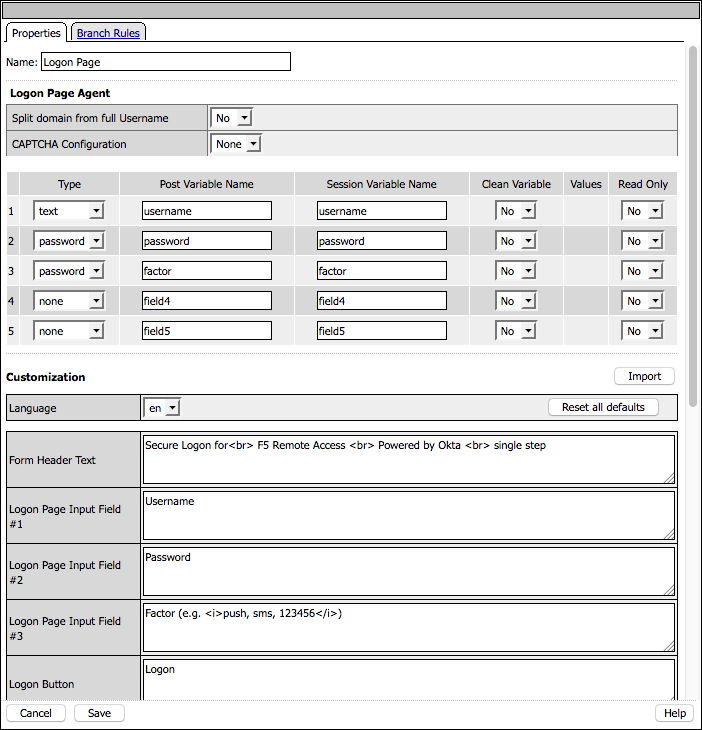
- The screen shown below opens. Click Logon Page to edit the logon page.

- The screen shown below opens.

- Enable a third input with the following selections.
Type: password
Variable: factor
Login page input field: Factor (e.g. <i>push, sms, 123456</i>)
- When done, click Save.
-
Edit the existing RADIUS Auth or replace an existing Auth sequence with a RADIUS Auth step pointing to the password only RADIUS server created in the previous step, as shown below.

- After the initial authentication insert a new RADIUS Auth step pointing to the Factor only RADIUS server previously created. Change the Password Source variable to align with the updated logon page input %{session.logon.last.factor}.

- Click Save to save the settings.
-
Click the Apply Access Policy button in the top left hand corner, as shown below.


