Overview of High Availability Configuration Workflow
Configuring High Availability
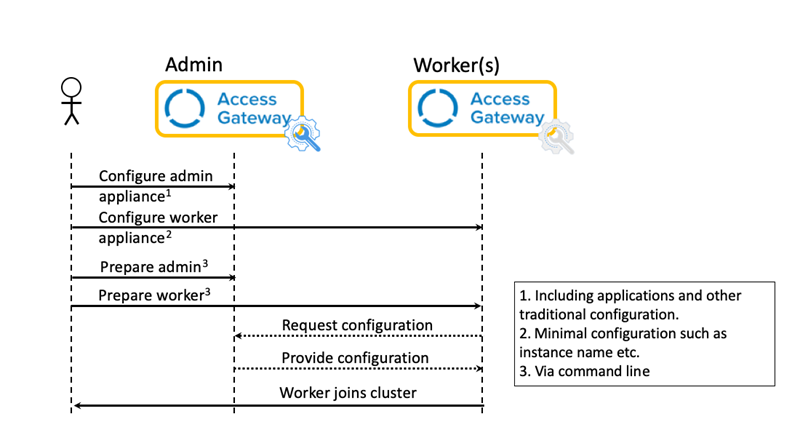
Configuring high availability includes the following overall process:
- Configuring an admin node.
During this step, the administration node is configured normally. - Configuring a worker node.
During this step, worker nodes are configured without any applications. - Preparing the admin node.
During this step, the command line interface is used on the admin node to alert or prepare the admin node for the addition of one or more worker nodes. - Preparing the worker node.
During this step, the command line interface is used on the worker node to prepare the worker for becoming a part of the Access Gateway cluster. - Worker integration into cluster.
After the previous steps, the worker is automatically integrated into the cluster. During this phase, the worker admin UI is disabled and worker exchanges keys and the admin node provides the configuration.
The following high availability management operations are supported:
When initially configuring a high availability cluster, cluster members communicate using HTTPS over port 443. Caution should be exercised when configuring high availability where proxies are in use. See Proxy configuration in the Network section of Command Line Management Console reference for information on configuring proxies and proxy bypass lists.
Add a worker node to an Access Gateway cluster
When adding a worker node, both the administration and the worker node must:
- Have been previously provisioned.
- Be reachable using SSH.
- Have had their keys reset. See Reset the key associated with an Access Gateway node
When preparing workers, ensure that you're connected to a worker node and not an admin. Running the prepare worker operation on the cluster admin renders the Access Gateway Admin UI console inoperable. Access Gateway version 2021.11.2 and later prohibit this operation. Nodes previously used as admins should be reset before reuse as workers. See Reset Access Gateway command line
-
On the Admin node:
- Connect to the instance Access Gateway Management console.ssh oag-mgmt@[admin.tld]
- Select 5 - System.
- Select 8- High Availability Configuration. The High Availability Configuration menu appears:Access Gateway High Availability Setup (role)
1 - Reset Key
2 - Prepare Admin
3 - Prepare Worker
4 - List Nodes
5 - Remove Node
6 - Check Status
X- Exit
Choice:
The High Availability menu displays the current role of a Access Gateway node.
Roles can be:
- Single - The node hasn't yet been configured as either a worker or an admin.
- Admin - The node has been configured as an administrator for High Availability.
- Worker - The node has been configured as a worker for High Availability.
- Select 2 - Prepare Admin.
When you configure an admin node for high availability for the first time, select and execute the 1 - Reset Keys option to reset the instance's SSH keys.
You only need to reset keys once per instance. See Command Line Management Console reference.
Access Gateway Replication uses the hostname setting from the command line console.
Ensure that you update the hostname for both admin and worker nodes using the command line console .
- The admin node generates and displays an authorization token (for example, oag.okta.com:8ba1c123-715d-4b70-ab5d-0e41493bef73), which must be provided to the worker node. Copy the provided authorization token: Authorization token required to initiate setup from worker nodes is given below. Copy the following text below this line and paste it on worker node when prompted. oag.okta.com:8ba1c123-715d-4b70-ab5d-0e41493bef73 Worker nodes available so far: . . . The admin node then waits for worker nodes.
At this point, the admin node waits for connections from worker nodes. Leave the window open until all workers nodes have been added. Entering X prematurely will cause the admin node to assume the process is complete and stop listing for worker node additions. Enter X only after adding all worker nodes
- Return to the command prompt on the instance, which is being attached as a worker node.
- On each worker node,
- Connect to the instance Access Gateway Management console.ssh oag-mgmt@[worker.tld]
- Select 5 - System.
- Select 8- High Availability Configuration.
- Select 3 - Prepare Worker.
When you configure a worker node for high availability for the first time, select and execute the 1 - Reset Keys option to reset the instance's SSH keys. You only need to reset keys once per instance. See Command Line Management Console reference..
- The worker displays:Checking HA readiness for host worker. . . Note: Please ensure that admin node is ready for setup and you have the authorization token displayed on admin node. Enter the authorization token displayed on admin node: <admin...com>:927da506-7efb-4520-bd32-dd03b86f2a9bAfter it's entered, the worker node connects to the admin node and exchanges authorization and confirmation information similar to the following:Requesting admin node <admin...com> to allow connection Node <worker...com> successfully added on admin node Synchronizing current configuration Press enter to continue ....
- When prompted, press any key to continue.
- Enter X to exit or any other menu item to continue.
The worker instance is now configured and ready for use.
On the admin node:
- Return to the admin instance Access Gateway Management console. View the results of adding the new worker node, similar to: Authorization token required to initiate setup from worker nodes is given below. Copy the text below this line and paste it on worker node when prompted. <admin...com>:927da506-7efb-4520-bd32-dd03b86f2a9b Worker nodes available so far: <worker1...com> <worker2...com> <worker3...com>
- Enter X to exit or any other menu item to continue.
List all worker nodes in an Access Gateway Cluster
- Connect to the instance Access Gateway Management console.ssh oag-mgmt@[admin.tld]
- Select 8- HA Configuration.
- Select 4 - List nodes.
- A list of all currently enabled Worker nodes are displayed, which should resemble: Admin Node: admin. . .com Worker Nodes: worker1. . .com . . . workern. . .com Press enter to continue ....
- Enter X to exit or any other menu item to continue.
Remove a worker node from an Access Gateway cluster
To remove an existing worker node from an Access Gateway cluster:
When a worker node is removed from an Access Gateway cluster, the node still exists but no longer receives updates from the Admin instance. In addition, the Access Gateway UI continues to be disabled.
Nodes removed from the Access Gateway High availability cluster should be removed from any load balancer and otherwise decommissioned.
After being removed, a worker node is no longer considered viable.
- Connect to the instance.
ssh oag-mgmt@[admin.tld] - Select 5 - System.
- Select 8- High Availability Configuration.Access Gateway Services... 1 - Reset Key 2 - Prepare Admin 3 - Prepare Worker 4 - List Nodes 5 - Remove Node X- Exit Choice:
- Select 5 - Remove node.
- From the list of known nodes, enter the name of the worker node to be removed and press enter.
- Confirm the removal of the node.
- Enter X to exit or any other menu item to continue.
Reset the key associated with an Access Gateway node
Access Gateway nodes use various keys to intercommunicate. You must regenerate keys if you want to use an instance as a part of an Access Gateway High Availability cluster.
You only need to regenerate keys once per instance.
- Connect to the Access Gateway Management console.
ssh oag-mgmt@[admin or worker] - Select 5 - System.
- Select 8- High Availability Configuration.
- Select 1 - Reset Key node.
- Enter y to reset the keys being used by the high availability sync process or N to abort the reset process.
- Enter x to exit or any other menu item to continue.
Check the cluster configuration
To review or check the status of an Access Gateway High Availability Cluster:
- Connect to the Access Gateway Management console.ssh oag-mgmt@[admin or worker]
- Select 5 - System.
- Select 8- High Availability Configuration.
- Select 6 -Check Status.
Check Status will show the latest status of the cluster only after there is a configuration change or when the NGINX engine is restarted.
If newly added nodes are not displayed, perform any Access Gateway Admin UI console function which causes an underlying engine status change. Or restart the NGINX engine. See the NGINX sub-menu in the Access Gateway Management console Service section.
- A list of cluster instances is displayed with their associated status, similar to the following:HA Synch Status Up/Down/Page Up/Page Down/Home/End - Scroll x-exit
worker1.yourdoman.tld: Pass
worker2.yourdoman.tld: Pass
. . .
workern.yourdoman.tld: Fail
Where:
- Pass: Reachable, functioning worker node.
- Fail: Non-functional worker. See the node log for details.
- Enter x to exit.
Synch worker with Admin
If a worker node is out of synch because of downtime or network issues, this option can be used to synchronize the changes from an admin to a specific worker on demand.
This option is only available on worker instances.
- Connect to the Access Gateway Management console on the worker being synchronized.ssh oag-mgmt@[<worker>]
- Select 5 - System.
- Select 8- High Availability Configuration.
- Select 8 - Synch from admin, which displays a message similar to: Requesting admin node <admin. . . .com> to allow connection Node <worker...com> successfully added on admin node Synchronizing current configuration . . . Press enter to continue
- Enter x to exit.