Use Okta MFA for Azure Active Directory
You can use Okta multifactor authentication (MFA) to satisfy the Azure Active Directory (AD) MFA requirements for your WS-Federation Office 365 app.
Use Okta MFA in the following cases:
- You want Okta to handle the MFA requirements prompted by Azure AD Conditional Access for your Okta-federated domain.
- You want to enroll your end users into Windows Hello for Business so that they can use a single solution for both Okta and Microsoft MFA.
Known issues
Users can enter infinite sign-in loop
End users can enter an infinite sign-in loop in the following scenarios:
-
Okta sign-on policy is weaker than the Azure AD policy:
-
Neither the org-level nor the app-level sign-on policy requires MFA.
Okta doesn’t prompt the user for MFA. However, Azure AD Conditional Access requires MFA and expects Okta to pass the completed MFA claim.
-
The sign-on policy doesn’t require MFA when the user signs in from an "In Zone" network but requires MFA when the user signs in from a network that is "Not in Zone"
If the user is signing in from a network that’s In Zone, they aren't prompted for the MFA. But again, Azure AD Conditional Access requires MFA and expects Okta to pass the completed MFA claim.
-
-
The user doesn't immediately access Office 365 after MFA.
If the user completes MFA in Okta but doesn’t immediately access the Office 365 app, Okta doesn’t pass the MFA claim. To get out of the resulting infinite loop, the user must reopen the web browser and complete MFA again.
Okta incorrectly sends a successful MFA claim
This happens when the Office 365 sign-on policy excludes certain end users (individuals or groups) from the MFA requirement. So although the user isn't prompted for the MFA, Okta sends a successful MFA claim to Azure AD Conditional Access. Azure AD Conditional Access accepts the Okta MFA claim and allows the user to sign in without requiring them to complete the AD MFA.
Before you begin
-
Configure MFA in Okta
Do either or both of the following, depending on your implementation:
- Configure an org-level sign-on policy as described in Multifactor Authentication.
- Configure an app sign-on policy for your WS-Federation Office 365 app instance as described in Get started with Office 365 sign on policies.
-
Configure MFA in Azure AD
Configure MFA in your Azure AD instance as described in the Microsoft documentation.
Start this procedure
You need to change your Office 365 domain federation settings to enable the support for Okta MFA. Choose one of the following procedures depending on whether you have manually or automatically federated your domain.
For manually federated domain
Run the updated federation script from under the Setup Instructions:
-
In the Admin Console, go to .
- Open your WS-Federated Office 365 app.
-
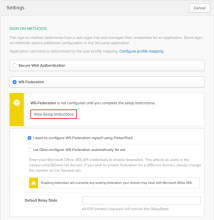
Click the Sign On tab > View Setup Instructions.
The How to Configure Office 365 WS-Federation page opens.
- On the page, go to the If your domain is already federated section.
- Copy and run the script from this section in Windows PowerShell.
- For the Okta MFA from Azure AD option, select Enable for this application and then click Save.
- Run the following PowerShell command to ensure that SupportsMfa value is True:
Connect-MsolService
Get-MsolDomainFederationSettings -DomainName <yourDomainName>Example result
CopyActiveLogOnUri : https://example.okta.com/app/office365/issueruri/sso/wsfed/active
DefaultInteractiveAuthenticationMethod :
FederationBrandName : Okta
IssuerUri : issueruri
LogOffUri : https://example.okta.com/app/office365/issueruri/sso/wsfed/signout
MetadataExchangeUri : https://example.okta.com/app/office365/issueruri/sso/wsfed/mex
NextSigningCertificate :
OpenIdConnectDiscoveryEndpoint :
PassiveLogOnUri : https://example.okta.com/app/office365/issueruri/sso/wsfed/passive
SigningCertificate : <SigningCertificate>
SupportsMfa : True
For manually federated domain (Microsoft Graph)
If you enabled the MS Graph federation feature, the PowerShell commands are different.
Run the updated federation script from under the Setup Instructions:
-
In the Admin Console, go to .
- Open your WS-Federated Office 365 app.
-
Click the Sign On tab > View Setup Instructions.
The How to Configure Office 365 WS-Federation page opens.
- On the page, go to the If your domain is already federated section.
- Copy and run the script from this section in Windows PowerShell.
- For the option, Okta MFA from Azure AD, ensure that Enable for this application is checked and click Save.
- Run the following PowerShell command to ensure that FederatedIdpMfaBehavior value is enforceMfaByFederatedIdp:
Connect-MgGraph -Scopes Directory.AccessAsUser.All
Get-MgDomainFederationConfiguration -DomainId <yourDomainName> | Select -Property FederatedIdpMfaBehavior
For automatically federated domain
In this case, you don't have to configure any settings.
- In the Admin Console, go to .
- Open your WS-Federated Office 365 app.
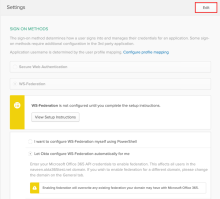
- Click the Sign On tab, and then click Edit.
- For the option Okta MFA from Azure AD, ensure that Enable for this application is checked and click Save.
- Run the following PowerShell command to ensure that SupportsMfa value is True:
Connect-MsolService
Get-MsolDomainFederationSettings -DomainName <yourDomainName>Example result
CopyActiveLogOnUri : https://example.okta.com/app/office365/issueruri/sso/wsfed/active
DefaultInteractiveAuthenticationMethod :
FederationBrandName : Okta
IssuerUri : issueruri
LogOffUri : https://example.okta.com/app/office365/issueruri/sso/wsfed/signout
MetadataExchangeUri : https://example.okta.com/app/office365/issueruri/sso/wsfed/mex
NextSigningCertificate :
OpenIdConnectDiscoveryEndpoint :
PassiveLogOnUri : https://example.okta.com/app/office365/issueruri/sso/wsfed/passive
SigningCertificate : <SigningCertificate>
SupportsMfa : True
For automatically federated domain (Microsoft Graph)
If you enabled the Microsoft Graph federation feature, the PowerShell commands are different.
In this case, you don't have to configure any settings.
- In the Admin Console, go to .
- Open your WS-Federated Office 365 app.
- Click the Sign On tab, and then click Edit.
- For the Okta MFA from Azure AD option, ensure that Enable for this application is selected and click Save.
- Run the following PowerShell command to ensure that FederatedIdpMfaBehavior value is enforceMfaByFederatedIdp:
Connect-MgGraph -Scopes Directory.AccessAsUser.All
Get-MsolDomainFederationSettings -DomainName <yourDomainName>.
Disable this feature
To disable the feature, complete the following steps:
-
In the Admin Console, go to .
- Open your WS-Federated Office 365 app.
- Click the Sign On tab > Edit.
- For the Okta MFA from Azure AD option, ensure that Enable for this application is cleared and click Save.
If you turn off this feature, you must manually set the SupportsMfa setting to false for all domains that were automatically federated in Okta with this feature enabled.
Use this PowerShell cmdlet to turn this feature off:
Set-MsolDomainFederationSettings -DomainName <targetDomainName> -SupportsMfa $false
Disable this feature (MS Graph)
If you enabled the Microsoft Graph federation feature, the PowerShell commands are different.
To disable the feature, complete the following steps
-
In the Admin Console, go to .
- Open your WS-Federated Office 365 app.
- Click the Sign On tab > Edit.
- For the Okta MFA from Azure AD option, ensure that Enable for this application is cleared and click Save.
If you turn off this feature, you must manually set the FederatedIdpMfaBehavior setting to acceptIfMfaDoneByFederatedIdp for all domains that were automatically federated in Okta with this feature enabled.
Use this PowerShell cmdlet to turn this feature off:
Update-MgDomainFederationConfiguration -DomainId <DomainName> -InternalDomainFederationId (Get-MgDomainFederationConfiguration -DomainId <DomainName> | Select -Property Id).id -FederatedIdpMfaBehavior acceptIfMfaDoneByFederatedIdp
How the feature works
Okta MFA satisfies Azure AD MFA requirement
Okta passes an MFA claim as described in the following table.
| Okta Org-level MFA | Okta App-level MFA | Azure AD MFA | What Happens |
|---|---|---|---|
| Disabled | Disabled | Enabled |
End users enter an infinite sign-in loop. To prevent this, you must configure Okta MFA to satisfy the Azure AD MFA requirement. |
| Enabled | Disabled | Enabled | End users complete an MFA prompt in Okta. Okta passes the completed MFA claim to Azure AD. Azure AD accepts the MFA from Okta and doesn’t prompt for a separate MFA. The user is allowed to access Office 365. |
| Disabled | Enabled | Enabled | |
| Enabled | Enabled | Enabled |
Okta enrolls users in Windows Hello
Prerequisite: The device must be Hybrid Azure AD or Azure AD joined.
If your organization requires Windows Hello for Business, Okta prompts end users who aren’t yet enrolled in Windows Hello to complete a step-up authentication (for example, an SMS push). After successful enrollment in Windows Hello, end users can sign on. Okta helps the end users enroll as described in the following table.
| Okta Org-level MFA | Okta App-level MFA | What Happens |
|---|---|---|
| Disabled | Disabled |
End users enter an infinite sign-in loop. To prevent this, you must configure Okta MFA to satisfy the Azure AD MFA requirement. |
| Enabled | Disabled | End users complete a step-up MFA prompt in Okta. Upon successful enrollment in Windows Hello for Business, end users can use it as a factor to satisfy Azure AD MFA. |
| Disabled | Enabled | |
| Enabled | Enabled |
Related topics
Office 365 sign-on rules options
Get started with Office 365 provisioning and deprovisioning
Windows Hello for Business (Microsoft documentation)


