Provision users to Office 365
You can create, update, and deprovision users in Office 365 from your Okta org. You can import users from different source directories into Okta and provision them in Office 365 using profile mappings.
Before you begin
- Complete Configure Single Sign-on for Office 365.
- Disable the Microsoft MFA for the Office 365 admin account you’re using for WS-Federation. If the MFA is enabled, it can break provisioning and single sign on set-ups in Okta.
-
Bring users into Okta: You can import users from a directory such as Active Directory (AD) or an app such as Salesforce. Currently, Okta doesn't support imports that take longer than two hours to complete. Contact Support if you have this type of import. You can also create users directly in Okta. See the following for more information:
-
Decide the type of provisioning, depending on your provisioning needs. See Provisioning options for Office 365.
Start this procedure
To provision users in Office 365, you need to:
1. Set up Okta to Office 365 provisioning
2. Map profile attributes Okta to Office 365
1. Set up Okta to Office 365 provisioning
You can automate provisioning tasks by enabling API integration and configuring settings for different user life cycle stages.
1.1. Enable API integration
Office 365 requires a token to authenticate against the Microsoft API. This allows Okta to implement provisioning in Office 365.
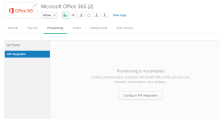
- Go to Office 365 > Provisioning > API Integration > Configure API Integration.
- Check Enable API Integration.
-
Click Authenticate with Microsoft Office 365. You are redirected to the Microsoft Azure login page.
-
Log into your Microsoft Azure account.
-
Read and accept the requested permissions.
-
Upon accepting the scopes in the Microsoft Azure portal, you will be redirected back to Okta.
-
- Enter your Office 365 Global Administrator credentials.
-
To import groups now, check Import Groups.
You can import groups later after finishing provisioning. See Skip importing groups during Office 365 user provisioning.
- Click Test API Credentials.
- Save the credentials once they are verified successfully.
1.2. Select provisioning type and settings
You can select provisioning and deprovisioning settings depending on the provisioning type you select.
- Go to Office 365 > Provisioning > To App > Edit.
-
Select Office 365 Provisioning Type. See Provisioning options for Office 365.
For Universal Sync only: Check Send full profile, contacts, and conference rooms from these AD instances if you want to sync AD groups and resources.
- Enable or Disable other provisioning settings. See Get started with Office 365 provisioning and deprovisioning.
- Click Save.
Each user provisioned for Office365 has an attribute, StsRefreshTokensValidFrom, which is a date that invalidates existing login sessions and refresh tokens when the user changes their password, requiring the user to log into their apps again. This attribute is automatically calculated and populated based on the Provisioning Type.
-
License Only or Profile Sync: The StsRefreshTokensValidFrom attribute is set to the current date and time when the user changes their password in Okta.
-
User Sync or Universal Sync: If the user is linked from Active Directory, the StsRefreshTokensValidFrom attribute is set to the pwdLastSet attribute in Active Directory. For all other users, the StsRefreshTokensValidFrom attribute is set to the current date and time when the user changes their password in Okta.
2. Map profile attributes Okta to Office 365
Depending on where your users are sourced from, the username format can vary. For users to successfully sign into Office 365, their username for Office 365 must be in an email address format for the domain you are federating (username@yourfederated.domain).
You must remap attributes whenever you make any changes to provisioning settings.
Map username as-is
If your users already have their username in an email address format for the domain you are federating (username@yourfederated.domain) format, you can map the email as-is.
- Go to Office 365 > Sign on > Edit.
- In Credentials Details > Application username format, select Email.
- Click Save.
Map custom username
If your users are sourced from different directories or apps, their username format may vary. You can use Okta expression language to customize the username that will be passed on to Office 365.
- Go to Office 365 > Sign on > Edit.
- In Credentials Details > Application username format, select Custom.
Enter this expression in the provided text box:
String.substringBefore(user.email, "@") + "@yourfederated.domain" - Replace yourfederated.domain with the domain you are federating.
- Enter an Okta user in the Preview box to check the result of the mapping.
- The resulting username should match the Office 365 username for the user.
- Click Save.
Map email address
If your users’ email addresses do not reside in the domain you are federating, you can use Okta expression language to customize the email address that will be passed on to Office 365.
Prerequisite
Provisioning type should be selected to User Sync or Universal Sync. See Provisioning options for Office 365.
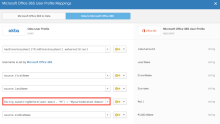
- Go to Directory > Profile Editor > Microsoft Office 365 Mappings > Okta to Microsoft Office 365.
- In the source.email field, enter this expression:
String.substringBefore(user.email, "@") + "@yourfederated.domain" - Replace yourfederated.domain with the domain you are federating.
- Enter an Okta user in the Preview box to check the result of the mapping.
- The resultant email address should match the Office 365 email address for the user.
- Exit Preview and save mappings.
- Click Apply Updates Now.
3. Test provisioning
Ensure you have correctly configured provisioning by assigning Office 365 to test users in Okta and verifying they appear in your Microsoft tenant.
Prerequisite: The Create Users option in Provisioning must be checked.
In Okta:
- Open Assignment tab of the Microsoft Office 365 app.
- Click Assign.
- Assign appropriate Office 365 licenses to test users.
- Click Done.
In Microsoft Admin Center:
- Open the list of Active Users.
- Ensure all test users appear in the list with appropriate licenses.
In Okta:
- Log into Okta as a test user.
- Ensure all Office 365 apps appear on the user dashboard.
Note
If you have selected the User Sync or Universal Sync provisioning type, all users irrespective of where their profile is sourced from, appear as Synced with Active Directory in the Office 365 tenant. However, the user is still sourced from the source directory.


